Sync Google Calendars and Google Sheets using the Sheets2GCal Sheets add-on.
To get started you first need to install Sheets2GCal here:
Google Marketplace
When installed click “Extensions” > “Sheets2GCal“, and select either:
1) Import Calendar to Sheet: set up a new Sheet and Import a Google Calendar
2) Advanced > Configure Sheet > Clear & Link Sheet: set up a new Sheet to create events to Export
You will have to authorize to grant permissions for Sheets2GCal to edit your Sheets and Calendars.
A free account allows you to import up to 5000 events per day, import “changes and new events” 10 times per day , manually import/export/delete up to 200 events per day, and automatically sync up to 100 events per day. Any paid subscription allows unlimited Imports and Exports for manual and automatic sync, and ‘Infinite Import’ to bypass Google’s 6 minute script limit.
Once your spreadsheet is linked with a Google Calendar you can manage the calendar from the Sheet, or manage the Sheet from Google Calendar using the various “Import” and “Export” options. This makes it easy to automatically populate calendars with data from your spreadsheets, or easily convert calendar events to spreadsheets for analysis, printing or sharing.
Sheets2GCal needs all the default columns present in the Sheet in order to work correctly. You can move columns, hide columns, rename them and create new ones for your own event-related data that will not be affected by importing or exporting changes.
Formulas are not replaced when importing changes from Google Calendar, and any cell containing a formula will be skipped. This means you can use formulas to configure your events, edit the event in Google Calendar and import changes from the calendar without affecting the data generated by the formula.
Each Sheet in a Google Spreadsheet is associated with a single Google Calendar for which you have read/write access. Create new Sheets for each calendar you will be using, and click either “Import Calendar to Sheet” to import the events from a calendar (preferred), or “Configure Sheet” > “Clear & Link Sheet” to setup and link an existing Sheet with any Google calendar directly, without importing any events, or just import an empty calendar. You can use the tabs at the bottom to create multiple “Sheets” in the same “Spreadsheet” and each Sheet will be linked to a separate Google Calendar. You can rename Sheets as you please, this will not affect Sheets2GCal. When moving between Sheets please allow a few seconds for the sidebar to update with the data from the new Sheet.
To create new events you must enter at least the Title and Start Date for All-Day events, or Title, Start Date and Start Time for timed events. All other columns are optional. Any rows without both Title and Start Date will simply be ignored.
Enter your events manually, or copy/paste rows/columns from other spreadsheets into the correct columns, check the “Update” checkbox for the events you wish to create/edit, then click “Update {Calendar Name}” in the “Export Sheet to Calendar” sidebar to save the events to that Google Calendar. You can also use formulas to pull in data from other Columns or Sheets, add extra columns and change the order or rename any column in newly created Sheets or after doing at least one “Import” for sheets created before Aug 17th 2025.
Events in the Sheet are connected to Google Calendar using the hidden Event ID column, so they can be updated or deleted directly from the Sheet. Click on an event’s “Link” to open the event in Google Calendar. A hidden ETag column is placed at the last column in the Sheet to track event versions and optimise importing without recreating the entire Sheet.
IMPORTANT: If you want to duplicate events you can duplicate existing rows but you must delete the event ID for the new rows to avoid conflicts, then check “Update” and click “Export” to create new copies of the events.
The “Update” and “Delete” cells for event rows that are successfully created, edited or deleted are coloured to indicate the status: deleted events will be marked red, created/edited events coloured green. Events that can not be exported or deleted because you have not enabled the option “Overwrite newer calendar data” and the calendar’s version is more recent will be coloured grey. To reset the colours you can remove colours for the row manually, or use the “Reset Colours” button in the sidebars for “Export Sheet to Calendar” and “Import Calendar to Sheet“
The two main Sheets2GCal windows are “Import Calendar to Sheet” and “Export Sheet to Calendar“. Use these to Import and Export events with various options. Once you have used these sidebars to set your options you can then use “Quick Import” and “Quick Export” to perform the same operations with the options that you chose – without even having to open the sidebars. “Quick Sync” runs these two operations in succession, and “Export All Sheets” or “Import All Sheets” runs the same operations on all Sheets in the current Spreadsheet which are set up to work with Sheets2GCal. Checking “Force Import Sync” before you “Import Changes & New Events” will ignore the sync token and ETag data (used to track previously imported changes) and perform a full import merge into the Sheet. Events in the selected date range (or All Events) will replace those already in the Sheet, events that are not found in the Sheet will be added, and events that have been deleted from the calendar will be removed from the Sheet, if present. This is useful if you have calendar data missing from the Sheet but don’t want to “Clear Sheet & Import Calendar”, if you need to preserve your own columns, for example.
INFINITE IMPORT
Paid subscribers have access to an option called “Infinite Import” which hands off management of imports to Google Cloud. This allows you to import calendars of any size that would fail if they take longer than 6 minutes to import (Google’s time limit for standalone Workspace Extensions using App Script). For calendars up to about 7000-8000 events this option should not be necessary, but for calendars larger than that the “Infinite Import” option ensured that the script does not time out before processing has completed. The only data stored in Google Cloud Run is a unbreakable “hash” of your email address and a securely encrypted refresh token that allows Sheets2GCal to access your Google Calendars and Sheets with no user interaction: no Sheet or Calendar data is ever sent or received to/from Google Cloud Run. This option is especially useful for importing or backing up large calendars to Google Sheets, and for running automatic syncing if you are hitting the 6 minute limit.
ACTION HISTORY
The clock icon in the “Import” and “Export” sidebars takes you to the history sidebar which lists the 25 most recent operations performed by Sheets2GCal, with totals to show how many events were created, updated or deleted and the email address of the user who initiated the operation. The type of operation is also listed: Import, Export, Import/Export or Sync (Export/Import), an infinity icon is displayed for operations that use the “infinite import” options, and a clock icon is displayed for operations that were launched automatically using triggers (“Automatic Sync”). You can clear the history for any given sheet, or check the box “All Sheets” to clear the history for every sheet in the current spreadsheet document.
TIME ZONES
The “Timezone” field is optional, and will default to the main time zone setting for your Google Calendar account. To use a different time zone for an event either change your general Google Calendar time zone, or insert the IANA timezone code for the event in the “Timezone” column. When sharing calendars you should not need to worry about this because other users will see the times automatically adjusted for their own time zone.
Sheets2GCal displays every event at the original time in the time zone for the event, not the Sheet’s time zone. To add a column that displays local times please go to Sheets2GCal > Advanced > Configure Sheet and click “Add Local Start Column”.
ATTACHMENTS
Sheets2GCal supports Google Calendar Attachments. Importing a calendar will automatically create an “Attachments” column containing links to the files attached to calendar events. You can use this column to add attachments to new or existing events during “Export”, or to delete attachments. Existing Sheets that do not have an “Attachments” column will simply ignore attachments, but you can add support for this to any Sheet in the Extensions Menu > Sheets2GCal > Advanced > Add Attachments Column. A new column will be added and the attachments for all events in the Sheet will be added to that column. Please note that attachment “Chips” are not supported, please use URLs for your documents, ensuring that you give access to anyone who needs to view the attachment.
To ensure you don’t accidentally delete existing calendar attachments by exporting empty Attachments data there is a new option “Include Attachments in Export” that you’ll have to enable once. If you used the built-in method to add a column and import attachments this won’t be necessary; but if you create your own Attachments column with no data you will have to check this option because exporting an empty Attachments column will delete calendar attachments.
GUESTS
Add a list of emails separated by commas in the ‘Guests’ field and these guests will be added to the event. To add or remove individual guests from an existing event without affecting others, append a + or - suffix to each email address (e.g. alice@example.com+, bob@example.com-). Once an event is synced with Google Calendar, this field will display the full Guests JSON data including guest RSVP responses. By default, this JSON is not written back to Google when you export to protect existing RSVP statuses from being accidentally overwritten during edits. If you want to update guests using the JSON directly please enable “Patch with Guests JSON” in the settings under Advanced > Configure Sheet. Check the “Send Notifications” checkboxes if you want notifications sent to guests for new events (future events only) or updates to existing events.
Please note that Google restricts the number of invitations you can send depending on your account type: free Google accounts can only add 10 guests per event, and send a limited number of invitations per hour/day. Paid Google Workspace users have higher limits.
ADD VIDEO CONFERENCE:
Type any text in the “Meet” column (I use “YES”) before creating an event and it will be replaced by the Meet ID as soon as the event is created. If you have added email addresses to the “Guest” column the Meet invite will be sent to the guests, again subject to the limits Google imposes. Zoom meetings are not currently supported.
REPEAT COLUMNS:
Repeat – must be Daily, Weekly, Monthly or Yearly.
By Day – for weekly repeats (only) you can use a comma separated list of two letter day names e.g Mo,We,Fr. The initial event should be on one of the listed days.
Until – this is date on which the last event in the repeat series occurs.
OR
Count – the number of times the event should repeat.
Interval – this is the interval of the repeat occurrences, so if “Repeat” is set to “Weekly” and Interval to 2 this will create an event every 2 weeks.
You can also use a Calendar ID to link the Sheet without setting it up (for advanced users only who understand why they might use it!) by using “Configure Sheet” > “Link Sheet“. This can be used to change the linked calendar for a Sheet that already contains events, but you will have to delete all the data in the hidden “EventID” column before creating new copies of the events. Doing this will automatically check the “Update” column for every row, and the events can then be recreated in the newly linked Google calendar and automatically given new Event IDs for future import/export.
The full iCal specifications allow other more advanced options, but to keep things simple Sheets2GCal uses these basic parameters. For a full explanation of how to build an RRULE please refer to this page:
https://icalendar.org/iCalendar-RFC-5545/3-8-5-3-recurrence-rule.html and please consider using GCalToolkit if you need to set RRULEs directly for events.
Sheet Doctor
If you are having problems or your Sheet columns/data need fixing you can use the Sheet Doctor in the Advanced Menu. This will check for missing essential columns and add/configure them if necessary. There is also an option to “Fix Data Validation” that will automatically reset the correct data types for each Sheets2GCal column: dates, repeat types, colour lists etc. If you recreate missing columns with this tool you’ll also be given an option to quickly import the data for that column (excluding Repeats, Dates and Times). If your Sheet column tracking gets completely messed up you can use “Reset Metadata” to completely remove all the column metadata, then run Sheet Doctor again to start afresh.
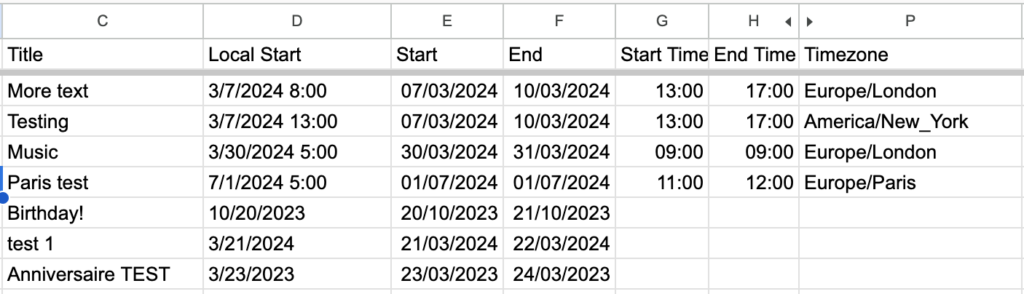
Displaying Event Dates/Times in the Sheet Time Zone
Sheets2GCal displays the data exactly as it is sent by Google Calendar. This means that the Start/Start Time and End/End Time columns display the Dates/Times of events in the events’ time zones.
If you manage events across multiple time zones you might, however, want to see events displayed in the Sheet’s time zone instead – as they do on your calendar.
The solution is to open the Extensions menu, go to Sheets2GCal > Advanced > Configure Sheet > Add Local Start Column. If it doesn’t work you may need to adjust the formula for the new column to use commas instead of semicolons.
If all goes well you’ll get something like this for a Sheet at Eastern Time. You can set your own format for the “Local Start” column as you would for other columns using the Sheets Menu > Format > Number.
The menu item “Advanced > Check Sheet vs Calendar” allows you to automatically detect rows which are different from the corresponding calendar event. This can be useful because when using formulas or the API, the “Update” checkbox cannot be checked automatically when rows are modified.
IMPORTANT: Please note that this option will also check the Update box for events that have been edited in Google Calendar but not in the Sheet, so if you edit in both Google Calendar AND Sheets, be careful not to overwrite your calendar edits. If you have a hidden ETag column this is not a problem, if not please use Sheet Doctor to add it and fetch the data.
Automatic Sync: this is the default and recommended option. Sync exports updates to the Sheet then imports changes made to Google Calendar since the previous import, including updates to events that result from the export. The hidden ETag column is used to ensure more recent calendar data is never overwritten, so if you are using a sheet created before Aug18th 2025 please first use “Sheet Doctor” to check you have the ETag column and follow the steps to “Import” missing ETag data if not present. This is the recommended option for syncing because exports can make changes to other events that should be imported.
Automatic Import > Export: this option imports changes to the Google Calendar since the previous import, then exports updates to the Sheet to Google Calendar. See “Export” below for more details on what is exported.
Automatic Import: this will only import changes to Google Calendar since the previous import. Please note that this will not overwrite any cells that use formulas.
Automatic Export: when used automatically this will process any rows that have been manually checked for update or delete, autodetect/update any rows which are different than the corresponding events in Google Calendar using “Check Sheet vs Calendar“, and delete events which no longer contain a valid Title and Start Date in the Sheet. It will, however, not delete the entire row data for events which are deleted (only the “eventID”, “ETag” and “HTML Link”), allowing you to preserve any formulas that might be present in the row for deleted events, and other data. For free users operations performed during Automatic Sync have a separate 200 operation daily quota in addition to the manual 200 per day limit.
Google Quota restricts the amount of data and the time that scripts can run, so you will probably run into problems with this option if you have Sheets linked to large calendars, or too many sheets with too many Import/Export options enabled. For large sheets it is recommended to purchase a subscription, connect Sheets2GCal to Google Cloud in the settings and use the “Infinite Import” option to bypass the usual 6 minute limit imposed on Workspace Extensions.
LANGUAGES
Sheets2GCal currently has support for English, French, Italian, Hebrew, Arabic and Japanese. To change the language for a Sheet first make sure that you have set the Spreadsheet’s “Locale” setting to one of those languages, then go to Extensions > Sheets2GCal > Advanced > Configure Sheet and click “Update Sheet Language“. This will translate the column headers, repeat options and event colours to the Sheet’s “Locale” language without affecting the functionality of the Sheet.
You can also change the Spreadsheet “Locale” to another language and this will change the language used in the Sheets2GCal sidebars and menus without having to update the language of the Sheet itself using the option above: as long as the Sheet is in one of the recognised languages it will work regardless of the language you use for the “Locale”, and from Sheets2GCal v2 (Aug 17th 2025) you can rename any column (please perform at least one Import Changes with v2 or run the Sheet Doctor before doing this in older v1 Sheets). To make corrections or add a new language please create a GitHub Pull Request for the ‘languages’ file here: https://github.com/GCalTools/Sheets2GCal/
The developer may not be held responsible for any problems caused directly or indirectly by the software. It is the user’s responsibility to ensure they have regular backups of Google Calendar / Sheets.
Made by GCalTools : Power Tools for Google Calendar